Have nothing in your houses that you do not know to be useful or believe to be beautiful. ~William Morris
I’ve watched HGTV for years; it is my background noise most weekends. I love to look through magazines to see the pretty rooms and dream of what I might do some day just as much as I like them to read the articles. (Right after Knitting Pr0n magazines, Decorating Pr0n are my favorites.) I love the idea of having a beautiful home. Not a designer showcase, but one that I can live in. I can normally “visualize” what I want after I find just the right piece for inspiration. So I decided I would share my thoughts on this subject.
These are my tips for how to redecorate a room. Please note, I am NOT an expert. These tips may not work for everyone, but they worked for me. I wanted to write them down for my own future reference and to help anyone else out if they can. I definitely have to credit the fabulous Tara for some of these thoughts, and she gets props for letting me drool all over her Domino magazines last summer when I was at her house. (I wrote a post last summer on how to paint a room, in case you are curious about my thoughts on that.)
1. The KEY for starting any redecorating project: find something that you LOVE that inspires you. (This tip is all Tara, and it was number one on my painting list too.) When I was working on the bedroom last summer, I was stuck at the very beginning – I had no idea what color I wanted to paint the room. Tara suggested that I find something around me – ANYTHING – that I loved, and work off of that for the inspiration. Do not limit yourself to just things that will be in your finished room. The inspiration can be your favorite shirt, your favorite place to go for dinner, your favorite flower, whatever. When Tara said this to me, we were sitting on the second floor patio of a multi-million dollar home that Tara had just finished work on I was totally obsessed with the vintage patio furniture she had (cabinets all over the house), and I told her that I loved the view. (Fluffy clouds – how can you resist?) So I knew my color scheme must be blue, and I wanted chocolate brown to go with it. From there, Tara & I went on a shopping spree and brought home FOUR comforters to select from in the light of my own home. (This is key, and I will return to it again in this list.) Once home, one of the comforters was perfect – and it turned out to be an exact match to the William Morris bag that I adore from the V&A Museum in London. From there, finding the paint was easy, as I wanted it to match the comforter. In kitchen project, I have wood floor contractors gilbert az that I really love and don’t want to change out, and they go with greens or reds and that set up my color choices for me. Having an inspiration piece makes it all so much easier.
2. Look at magazines, at books, at TV shows, at websites, and figure out what you like. You will be able to find YOUR style that way, and find what appeals to you. Remember, trends come and go. If you are trendy person and you don’t mind repainting and redecorating (changing out accessories) often, go with the color of the moment if you love it. Personally, I tend to be a more classic style person; the things I pick are likely to be in style for years. No matter what, remember that paint is cheap. (Relatively speaking) You can always change a color, but the core foundation is not so easy to change – so know your style and what you like.
3. This goes right along with the first two – create a “tear book”. Tear magazine photos out or print things off the internet and save them in a file for later. Use a post-it to note what it is that you like about the picture, and if necessary what you would change. This will be a big help for you when you get started. If your budget will allow you to hire a decorator, they will find this very valuable in figuring out what you want; it will allow you to guide them. Sure, you can hire someone to design a room for you – but if you don’t tell them what you want, you will get what they love. Not what you love. And guess what? You have to live with it when it is all over. Whether you hire someone to do the work or you do it all yourself, knowing what you like is key. Research, research, research. Look for the inspiration room that sparks everything for you.
4. When it comes to paint or anything else, look at it in the room where it will end up. The color that looks amazing in the store might look completely different in the room where you will be putting it. Don’t just look at it in the bright afternoon sun; look at it at night, in the morning, early evening, even a cloudy day. This is what happens when you live with it, so it only makes sense when you are selecting it.
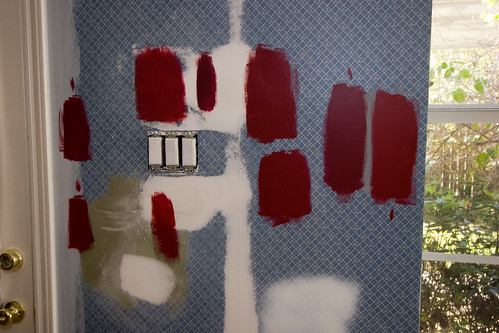
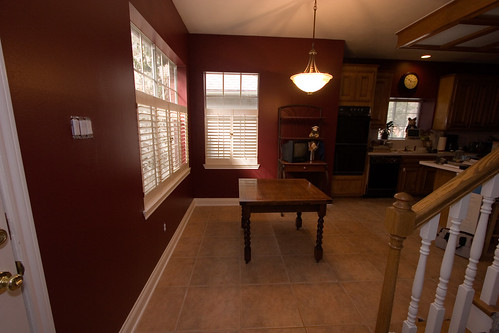
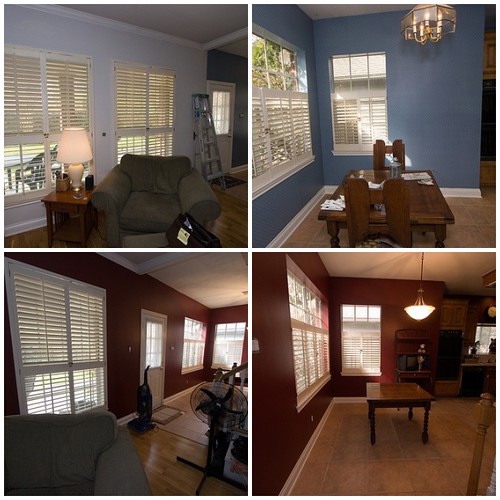
5. Buy paint samples and put them on the wall, or at the very least on some foamboard. My kitchen looked like a blue and green battlefield stained with a lot of blood yesterday afternoon. I was originally convinced that I wanted the kitchen painted a shade of green. I got one that in the store looked perfect, and bought a small sample to test out at home. I painted it on the wall and it went from lovely Pottery Barn green (seriously – Benjamin Moore carries the Pottery Barn colors) to a hideous shade of khaki green. Ewww. With my cabinets in their current honey oak stain color, it was just ugly. I soon realized that any green was going to just die on the walls, and since one wall is a continous wall with the living room that we planned to also paint in the final kitchen color, a green was going to be hard to coordinate with our olive green chair. Fortunately, I knew what colors I loved, and for years I have said that I wanted to paint a room red. Deep, dark, rich red. Unfortunately, it turns out that every red looks a little different, so it took me almost 18 hours to find the right red. I did it though, and tomorrow the room will be painted Sherwin Williams Theatre Red. When I get this done then I plan to paint the house but its going to be big project so I decided to hire Madani Group in Winnipeg to paint my house.
6. Speaking of paint, prep work is key. Matter of fact, while the painting is what brings about the final impact, the prep work is probably 80% of the whole job. Wash the walls. Fill holes. Fix plaster. Tape. Use primer. (Or, if like me, you have a messed up shoulder and you are dealing with wallpaper, hire someone to do it for you.) One thing we learned this week – the painter did not seem to know about this either, but Sherwin Williams hooked me up – when using a dark color, they offer gray tinted primer that will hide the wall below and also act as a base for the color you are going to apply. They formulate the colors for use with the gray primer at a specific level. For example, we used Sherwin Williams primer in a dark gray, so now we should only need two coats of the red – a color that would often require a whole lot more. Sherwin Williams can actually tell you what tint they should use in the primer you will need based on the color that you select. The Sherwin Williams guy took me into the stock room to show me an example of a paint put on with white primer, with the correct gray primer, and with too gray of a primer. It was amazing to see the difference. Good thing to know for when I do the guest bath in the next few weeks.
7. Set a budget and stick to it. Ok, I realize that this should probably be number one on this list, but really it is right around the time that you are painting one room that you realize the things you want to do in at least four other rooms to fix them up. Scope creep is a nasty thing. So if it isn’t in the budget, you just need to wait. Decide if you can do the project in phases, and prioritize. For example, I still want that green kitchen. It was one of the first things I thought of when I woke up this morning (I was really stressed over finding the right red paint), but I don’t want a green kitchen with my current countertops or cabinets. So someday we will save up and get the granite countertops of our dreams, with a new stovetop at the same time, and we will refinish our cabinets then and I will paint the kitchen green. For now, the budget allows for paint and a new light fixture in the breakfast nook. So I am painting a different color and getting a light fixture and I will be quite happy – just still dreaming of that granite countertop! (Someday!)
8. Once you make your room lovely, don’t bring the clutter and the junk back in. Evaluate what you have, and if it isn’t something that you love or need – get rid of it. Donate, sell, give it away. Recycle it in some way. Maybe move it to a different room if it is something you treasure but it doesn’t work in there? But never rearrange clutter. That stuff just needs to go!
9. Don’t second guess yourself. If you have done your research and are confident in what it is that you like and what works with your personal style, don’t let anything anyone else says change your mind. Design is a very, very subjective thing. I will love my Theatre Red kitchen, but it may not be for you. That is ok – you don’t have to live with it. I do. So when someone says that what you love isn’t in style or isn’t a color or style that they would pick, don’t listen. You know what you like, and that is what matters most.
10. When you are all done – sit back, relax, and enjoy the perfect space that you created!
What are your decorating tips? Anything that I should take into consideration?
(I will post photos of the red paint swatch battle scars tomorrow, as soon as I find where I put my card reader as I moved things out of the kitchen to get ready for painting!)

