I wrote this on Tuesday, but before I could publish it the laptop died. I forgot to post it when I got home that night – oops! It has been a crazy week.
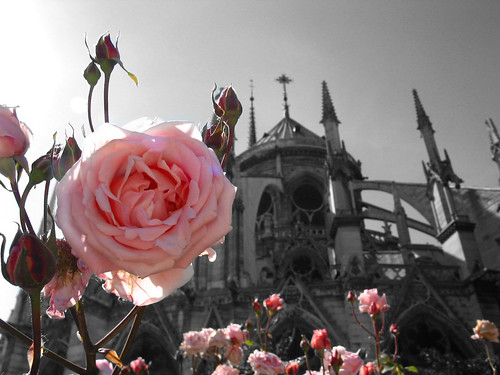
I’ve been meaning to write this for awhile, and since I am at my Photo I class without anything to develop (stupid winter weather and gray days outside), I decided it was a good time to write up my tutorial on how I created the colorized images I’ve posted recently, but if you want to do these cutouts, then check out these Photo Cutouts services.
Step 1 – Open up the image you want to color in Photoshop. (I use Photoshop CS2. I’m sure you can do this in other software, but I don’t know how. So these are the steps I do in Photoshop CS2.)
Step 2 – Convert the image to B&W using your preferred method. I use the Channel Mixer. Be sure to click the “Monochrome” checkbox, and set the Red, Green and Blue channels. I set this one to Red 60, Blue 20, and Green 32. Some people say you should make sure the numbers add up to 100. Others recommend settings similar to what I use. In the end, it is all about what looks best to you.
Step 3 – Set the color for the paintbrush to black for the foreground and white for the background. “Paint” over anything you want in color with black and – bam! – the color will appear! If you accidentally paint over something you don’t want in color, switch your paintbrush to white and paint over it again and it will go back to black & white again.
That’s it! I change the paintbrush settings to larger settings to make it faster to color, and I change it to very fine pinpoint to get into small places. Save it when you’re done (don’t save over the original if you want to keep it in color!) and enjoy!
22 replies on “How to Create Spot-Color Photographs!”
I tried it… but all mine is doing is going to a different shade of grey…
Cool. I figured it out how to do it in Photoshop Elements 2.0. The way I did it was creating a new “Hue/Saturation” on top of the original photo and then setting the saturation all the way down so that there is no “color” in the photo. Then do the black and white thing and just color in the part you want to.
I’ve been trying to figure out how to do this in Paint.NET but haven’t come up with anything yet.
I’ve tried all different ways to do this (searching for tutorials and forums) and I can never get it to work. I’ll have to try this way and see what happens. I’ve been just desaturating around what I wanted to keep.
Dell – which software are you using? And when you start with the color image and change it to black & white, is that change in a new layer? (I didn’t say to make a new layer because in my copy of Photoshop, it just makes the new layer on its own.)
NinaKaye – let me know how it works out!
Yeah, the layer is key. It took me a while to figure that out and then to figure out which kind of layer I wanted. Anyway, here my finished photo is here: http://www.flickr.com/photos/eggplant/105011089/. I recommend looking at the bigger size. It just looks better that way.
Got it. It was the layer thing…
Hey Christine! Very cool tutorial. Did you happen to get my email asking you about the purple on my Powershot digital? Can you point me in the direction of a good resource for help with this?
Thanks for stopping by! I’m so excited when someone reads my blog.
Thanks for the tutorial. I love this photo too.
wooo hooo wow!! thanks!!
am off to play 🙂
you KNOW i’ve been waiting for this. i’m going to play with it whilest i’m sick 😛 THANK YOU!!!
Thanks for the how to…now I have to find sometime to try it out on some of my Vienna shots 🙂
yay, i was hoping you would share with us how you did it! i tried it out on one of my photos in my flickr stream and it came out great 🙂
Hi there. I loved this tutorial, it helps a lot! I tried and it didn’t work out at first but I managed at the end after some exploration:). Anyway, can I translate it for my blog (into Spanish)?
buggeration… I am not sure this works for Photoshop 7!
I have a paint bucket but not a brush. BUGGER.
Thank you though for the tutorial. More playing to come 🙂
Hmmm… there isn’t anything that looks like a paintbrush? That is strange, because I have always seen a paintbrush in any graphic program – PaintShopPro, Photoshop, etc. It would look like an artist’s paintbrush, not the type you use on a wall.
I tried the paintbrush (I use photoshop cs) and never worked. THen I use the eraser and it worked pretty well. For color, the eraser; for painting in b/W again, the paintbrush with white.
It’s taken me a while to actually try this, but I can’t get it to work. I’ll just stick with the desaturate thing I’ve been doing.
After reading the other comments, I tried the eraser thing, and that worked.
Yeah, I can’t get the paintbrush to work either. It just literally paints black over everything…erasing it from the top layer to let the color layer works and only selecting what you want in b/w and desaturating that also works.
I don’t know how the color shows up when you use the paint brush, though – I just get paint streaks! Oh well!
Thank you so much for all of the information. I was using Photoshop 7 and the erasing worked to get color….still trying to figure how to paint without the paint brushing it to black….BUT nonetheless I AM EXTREMELY HAPPY, you all taught me how to do this!!! THANKS!!!
Right click using the eraser and the black and white section comes back when you have over colored.
:o)